Damp Proof Course
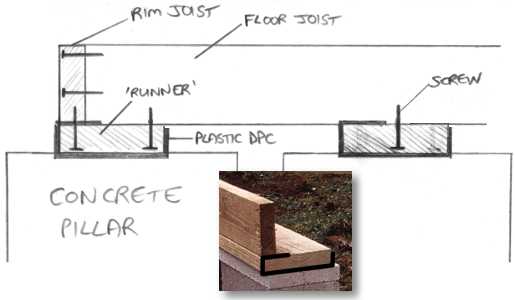
I'm using plastic damp-proof course (dpc), which comes on a 30m roll and is 450mm wide. With a bit of luck one roll will be enough to do the whole shed.It took me a while to work this one out because originally I wanted to wrap the dpc around the whole of the runner, but if I did that how would I screw it to the joist from below without puncturing the dpc? The solution was this: Staple the edge of the dpc to the top of the runner, all along its length, and leave the other end loose. Then attach the rim/floor joists to the runner with screws. Finally, wrap the loose end of the dpc around and staple it to the side of the runner, again along it whole length. This is as secure as I can get it and covers the entire length of the runners, which are the only parts in contact with the concrete. I could make it easier for myself by just stapling both ends to the side of the runner after I've constructed the whole floor, but that would be too easy! The harder way makes sure that any outside edges are tucked in neatly, and no edges of the dpc are exposed to the elements. Why am I screwing the floor joists to these runners? I probably don't need to do it, but if I jump around in the shed (hey, it'll be an indoor 5-a-side at least!) I don't want any bounce or creaking at all. And screws rather than nails because nails might pop out (creak) which might also puncture the dpc. Belt and braces all the way for this shed! Update
I've decided that screwing in from below is really making a lot of hard work for myself, so the simple solution is to screw in at an angle from the sides of the floor joists. These screws won't be seen so neatness isn't necessary. The 'L' shape shown in the picture will still need to be attached from below as shown, but the intermediate runners can all be completely wrapped in dpc and attached with screws from above and at an angle. This means I don't have to turn the whole thing upside down once it's done - I can create the edges of the frame separately, then attach the floor joists the right way up. The simple ideas are the best!
| 