|
I wasn't even supposed to be starting the roof shingles today, but I thought I'd have a go with the chalk line to see if it was easy to mark out my lines. As it turned out there was no problem with it, and as usual once I was out there I thought I may as well do something else - shingling! By the way, the chalk lines are all 14cm apart, for those who want to try this at home with the roof shingles from Wickes. The line for the first row was 32.5cm from the edge, which lets the shingles hang over by half an inch (mixed metric and imperial again!). It's a good idea to have this overhang because it can hide any small irregularities in the line of the roof, and it provides a drip edge if you don't already have one. I wasn't expecting to get quite so much done, but it's surprising how much area one of the shingles covers. They are a metre wide so before you know it you've done one row and are onto the next. As my roof has a valley, the further up you go the more shingles are needed, but I still managed to do 10 rows today, and that'll do for me! The forecast for tomorrow (Monday) is sun, and as that's when I was supposed to be starting I'm a day ahead already. I did have one shower of rain in the middle today, but it lasted all of 10 minutes so I just kept going afterwards. It looks good so far, and I'm very pleased with my progress. Tomorrow may be a little slower because I will need to use the roof ladder to lay out the shingles, but I'm sure I'll get a lot done anyway. PS The trellis isn't forgotten (those fence poles look a little lonely, and I should have put them back in the shed), but I can do that anytime - the shed roof is the important job!
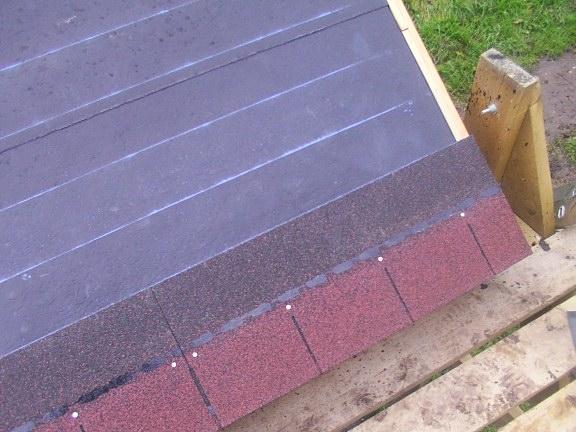
This is the first time I've used a chalk line and it's SO easy. I measured where I wanted the lines, then put a nail in the right-hand side of the roof (in the trim which will be hidden anyway). Then I just made a mark at the other side with a pencil, hooked the end of the chalk line onto the nail and fed the line out to the mark. You just lift up the end of the line and 'ping' it, leaving a perfectly straight line between two points.The nailing is also pretty straightforward, but it HAS to be in the positions shown here. This is so that when you put another layer on, the nails go through that shingle and the one below, so you're actually getting two rows of nails per shingle.
|
|
Back Next
|
|
